
Welcome back commander!
In the first article we talked about the background of Operation Bagration, and the new Tank Destroyers making their debut in Flames of War Late War. While the Hetzer and the Panzer IV/70 are sure to bring pain to the armour of your enemies, let’s not forget what updates Bagration has for the Tank and Infantry Formations!
The Infantry Formations of Bagration
Grenadier Company

Grenadier Kompanies of the Kampfgruppen are the background of any German Formation. Since the Battle of Kursk in Fortress Europe, obsolete equipment has been removed, new 12cm Mortars now an artillery option, and the formation structure has expanded to include two additional support options to field. You can now field a 2cm Light AA Platoon as well as a Grenadier Scout Platoon, giving the Grenadier Company some defensive or offensive capability based on your usage with them.

Also, all regular infantry platoons in Bagration now carry the Panzerfaust, with the cost added in by default. We no longer have the 2.8cm AT Rifle, phased out as mlitary technology progresses in 1944.
Grenadier Scout Platoon
Do I hear more dakka?

We covered the Escort Platoon in the previous article - assault rifle-toting, StuG-riding men dishing out shots on a 3/3 ROF with an assault value of 2+. The infantry formations get a similarly armed unit in the Grenadier Scout Platoon, a unit of 3 or 5 stands with as much tactical versatility as you will ever need.
Their options include the bolt-action K98 Rifle which makes them as strong as an M1 Garand team when shooting, and gives them a range of 16”, the standard of most regular rifle infantry teams. Switching them over to the much aggressive MP40 costs a grand total of one point, albeit reducing the range to a mere 4”, but you do get 3/3 ROF and an assault value of 3+.
With a Counterattack of 6+, we need to accept that in a scenario where infantry and armour comes into contact, your Scouts will have one volley to do as much damage as possible. While K98s would not do much at all, your unpinned MP40s at least allow you to utilize the best of their ROF3/3 per stand, and if assaulted by armour in the open, that one Panzerfaust (if equipped) better be hitting its shot.
Continuing with the tradition of German veterans, these Grenadier Scouts are actually decent on the attack. Moving from cover to cover with the Scout rule making them a 6+ to hit under concealment, their 4+ or 3+ assault rating makes them the bane of entrenched gun positions.
Armoured Panzergrenadier Company

The Armoured Panzergrenadier Formation Table in Bagration is exactly the same as that in D-Day, except that the third slot for an optional Armoured Panzergrenadier Platoon now expands for a player to bring in armoured options, and all infantry platoons now carry panzerfausts by default.

However, expect infantry platoons to be smaller overall. Bagration Panzergrenadier options only allow for one Panzershreck anti-tank team to be added, making you change your tactics in the face of assaulting armour. With the expanded options of armour into the formation, fewer Panzershreck teams are needed to deal with enemy tanks.
Players who are comfortable with just two platoons of infantry and often relying on Black Box support to bring in armour can rest assured in this expansion of the Formation table, making their core formation all the more tougher.
Panzergrenadier Company

The dismounted Panzergrenadier Formation underwent a similar update as their mounted counterparts.
They are similar to their D-Day Germans with the addition of armour, and they suffer the same change in terms of Panzershrecks. Personally I feel that tanks in the main formation allows for more versatility, while panzershrecks for the most part are there to ward off enemy tanks, 2 points sitting on the objective.
Reconnaissance Company

The makeup of the Reconnaissance Company mirrors that of D-Day’s, with expanded options in being able to field the SD KFZ 221 & 222 Light Scout Troop and the SD KFZ 231 Heavy Scout Troop options.
With most of them carrying the same gun with the exception of the Puma’s powerful 5cm gun, it’s mainly a choice between the slightly more armoured ‘231’ versus the ‘250’ half-track, and the wheeled ‘221 & 222’ which has an option to swap the MG for a 2.8cm gun.
Storm Grenadiers Formation
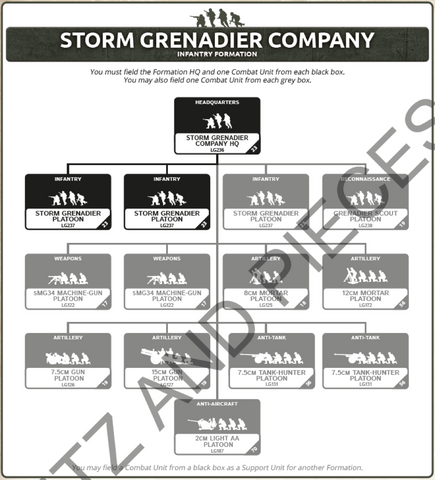
Now we come to the sweet stuff, the new infantry formation in the form of Storm Grenadiers. These men make their debut in Bagration Germans with a storm.
What I am particularly interested in is the reappearance of the 8cm Mortar Platoon (LG125), this time in a formation equipped with MG42s, and trained to the level of the Panzergrenadiers. While it was missing in D-Day, this option allows you to bring forth 2 to 6 infantry mortar stands, giving you the option to fire effective artillery with 4 or 6 stands, and create a larger smoke barrier than the Mortar Sections in the Panzergrenadier formation.
The versatility of this formation cannot be understated. Being the first Formation in the Late War to offer two sMG34 MG Platoons, the Formation allows you to clearly designate defenders and attackers, your regular infantry being a mobile option if you choose to bring in two platoons of heavy weapons to secure objectives.

Storm Grenadiers operate similarly as Grenadiers, but carrying MG42s instead of Kar98s. With similar options to add in, they cost slightly more for the upgrade which I’d personally feel is worth it.
The Storm Grenadier formation is an upgrade for all dismounted formations. A balance of mobility and hardiness with the supporting units, they are an amazing formation to bring in defence, with the versatility to push into the attack in a moment’s notice.
The Panzer Formations of Bagration
Tiger Tank Company

The Tigers of Bagration share similar stats with those of D-Day, being the same veterans of 1944 just of a different Front.
Compared to their D-Day counterpart, the Eastern Front Panzer battalions possess four different options of AA support. We look at the two newcomers in the form of the Ostwind and the Wirbelwind Flakpanzers.
Ostwind

A Mobelwagen given armour, the Ostwind presents a challenge for light tanks to eliminate when kept as a rear guard. In a dogfight, the ‘East Wind’ might even be able to take out pesky Stuarts and T-70s trying to make a run for your precious guns.
Wirbelwind

An armoured option for a ROF5/3 meatgrinder, the Wirbelwind makes sure that any aircraft deciding to make its appearance would have to think twice. Not only that, the ‘Whirlwind’ reaps the heck out of half-tracks making for your line, quad guns actually promising bloody murder to any allied infantry caught out of their foxholes.
Panther Tank Company

A change to the Panther Company of D-Day – You can now bring in Panzer IV/70 and Armoured Panzergrenadier options into your core formation! Those who’d prefer having infantry as their core can now beef themselves up, lessening the chance of a formation break.
Running at its usual cost of 11pts per tank, the Heer Panthers continue to face tough competition with a new book of other options. Bringing the Armoured Panzergrenadiers should be a no brainer for the German player as it provides a fast moving mobile presence, and provides more survivability against those allied AT14 guns.
Panzer IV Tank Company

The workhorses of the Wehrmacht. The reliable Panzer IV retains their stats and hardware from the D-Day and Fortress Europe books, with the expanded AA options offered to the Panther and Tiger Companies also available to them. However they are relegated to bringing StuGs instead of Panzer IV/70s as compared to the Panther Formation.
Panzerwerfer 42 Battery

Our last reveal, the Panzerwerfer 42 is a mobile option compared to the Nebelwerfers, while costing an average of 1pt more per piece. However, they being armoured units are not subject to the counterbattery rules of Repeat Bombardment, cannot be pinned, and can move about the battlefield forcing re-range ins. While the Nebelwerfers require a 4+ save against anything, the Panzerwerfer can take the heaviest artillery hits in the game and walk away with a 3+ to bail.
Next up!
The third and final installment of the German Bagration series will focus on list building and tactics!
By Jing Hao
